
The blog post will showcase the process of creating a cloud-hosted environment using LCS and the Azure Portal, in a step-by-step manner.
Use this guide to create a personalized environment for learning or presale purposes.
Step 1: log in to the LCS.
Login to LCS using your credentials.
Step 2: Create a new project
Inside the recent project, click on the ‘+’ button to create a new project.

Step 3: Navigate to the 'Finance and Operation' section.


Step 5: Enter Project Details.

The project will be created once the create button is clicked.
Step 6: Login to Azure Portal
Access the Portal.Azure.com using your LCS login credentials.
Step 7: Click on the subscription.

Step 8: Select your active subscription.

Step 9: Choose the IAM and create a new role.

Step 10: Select the role assignment.

Step 11: Select the contributor for the role.

Step 12: Select the member tab.
Step 13: Click on the select Members.
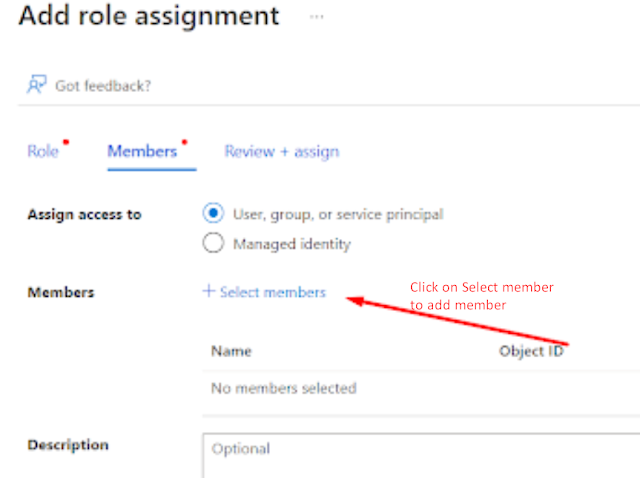
Step 14: Select Dynamic Deployment Service.

Step 15: Review and Assign Role
Click on ‘Next’ and review the role. Once done, click on ‘Assign’. Your role is now created.

Return to LCS for the next step.
Step 16: Click on the burger icon.

Step 17: Select the project setting option.

Step 18: Click on the Azure connector and Add button.Step 19: Enter Azure Connector Details


The Azure role assigned to you can be viewed on the following page.

Step 20: Certificate from LCS after receiving it.

Step 22: Continue with the remaining steps of the LCS. Select the Azure region and connect.

Azure Connector is created now.

Step 23: To access the cloud-hosted environment, click on the burger icon and select it.

Step 24: Click on Add button.

Select the latest Application version.

Step 25: Select the environment topology.
For development purposes, choose DEVTEST; for demos, choose DEMO.
Select 26: Select Develop for development purposes.
Step 27: Specify the environment name and choose an appropriate VM size according to your needs.

Click on deploy.


0 Comments