
In modern times, email receipts have become increasingly popular as an environmentally-friendly alternative to paper receipts for retail transactions.
Businesses can offer customers the choice of receiving a printed receipt, an email receipt, or both, which can help them minimize their environmental impact without compromising on customer service quality.
This guide provides a detailed explanation on how to set up email receipts within Dynamics 365.
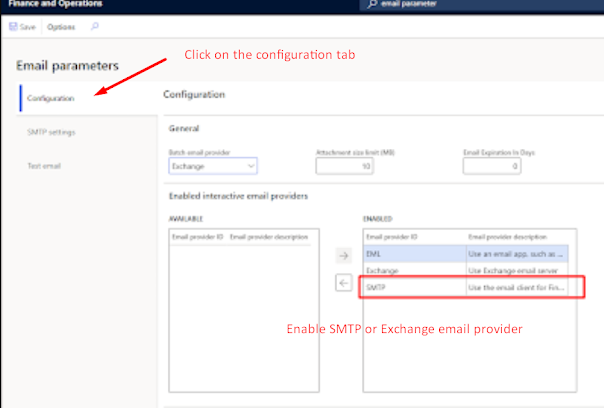
Step 1: To integrate Dynamics 365 with the SMTP server, go to System Administration > Setup > Email > Email Parameters. Then, assign appropriate values to the fields to activate email features.

Step 2: To create an email receipt template, go to Organization Administration > Setup > Email Templates.
Create a new template and then upload your customized email body message, using the provided placeholder.
<pre>
%message%
</pre>


Step 3: To set up an email notification profile, Navigate to below path.
Go to Retail & Commerce > Headquarters Setup > Parameters > Retail Parameters.
Then, click on the General tab and choose the desired option for "Email Notification."

Step 4: To configure the email receipt defaults, navigate to the "Email Receipt" section by following this path: Retail and Commerce > Headquarters Setup > Parameters > Retail Parameters > Posting tab > Expand "Email Receipt."

First, navigate to the store you wish to set up email configuration for and choose the email notification profile.
Then, access the store's functionality profile and select the email receipt ID.
Step 5:Access the store's functionality profile by clicking on it.


Step 7: Once the previous steps are finished, proceed to execute the subsequent tasks: 1070 - Channel Configuration, 1090 - Registers, and 1110 - Global Configuration.
After sales are completed, the point-of-sale (POS) system will display email receipts.

To check email sending failures, follow these steps: Go to System Administration > Setup > Email > Email History.
If an email's status value is marked as "Failed," it is necessary to check the error message located in the "Failure Details" tab and decide whether any necessary corrective actions need to be taken.
Businesses can set up email receipts in Dynamics 365 by following these steps, which not only reduces their environmental impact but also offers customers a practical and sustainable alternative.


0 Comments